To keep your Keurig operating at its best and consistently delivering that perfect cup of joe, regular cleaning of your Keurig machine is essential.
In this article, I’ll show you the best way to clean Keurig and share expert tips along the way to ensure your machine remains in peak condition. So, let’s get started!

As an Amazon Associate, I earn commission from qualifying purchases.
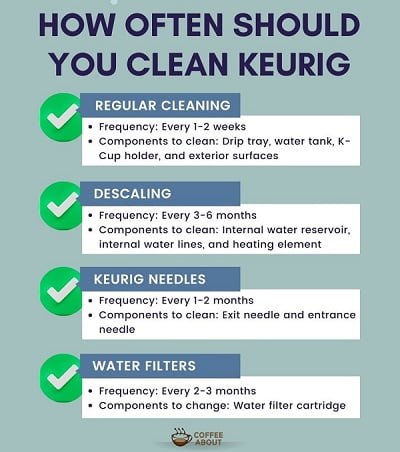
First, How often should you clean your Keurig?
To keep your Keurig coffee maker in pristine condition, regular cleaning is key. Just like you clean your plate after each use, you need to clean your Keurig too.
And for the descaling part, According to Keurig, the frequency of descaling your Keurig depends on the mineral content of your water. To maintain optimal performance, it is recommended to descale your brewer every 3 to 6 months.
Some models have light-based alerts for descaling. You’ll get a “Time to descale” indicator initially, and if delayed, it reminds you every 6 weeks.
It’s worth noting that the reminder will continue to appear until the brewer has been descaled.
How to Clean a Keurig
Daily Cleaning
It’s important to remove the used K-Cup from the holder as soon as possible after brewing. This will prevent coffee grounds and residue from building up.
Also, wipe the cup holder with a damp cloth to clean any spills from the K cup.
Weekly Cleaning
The weekly cleaning process keeps your Keurig in tip-top shape and will take only around 5 minutes. All you need is a large mug, a non-abrasive cloth, dish soap, and access to a sink.
1. Wipe the machine’s Exterior
Start by using a damp cloth with some soapy water to wipe down the outside of the Keurig. Avoid immersing the brewer in water or any other liquids.
2. Detach and clean the removable parts
After that clean the drip tray: Gently slide it outwards while keeping it level to prevent any spills. Rinse the drip tray and the plate with warm water.
If your Keurig model has a removable water reservoir, take it out along with the lid. Clean them both using a damp cloth with some soapy water and rinse them thoroughly. Make sure to keep the reservoir’s lid open to allow it to dry completely.
Remove the K-cup holder from the Keurig. It usually comes out easily with a gentle pull. Wash it with warm, soapy water, and use a soft brush or toothbrush to clean the needle area to remove any coffee grounds or clogs.
3. Run a cleaning cycle
To run a cleaning cycle place a large mug on the drip tray and press the largest brew size button on your Keurig without inserting any pod.
It’s important to run a cleansing brew periodically to prevent bad coffee taste. You can use rinse pods for more effective cleaning.
It’s a good practice to use Keurig rinse pods at least once a week or if you brew different types of drinks with your Keurig, i-e tea, chocolate, and coffee. These pods contain cleaning agents such as maltodextrin, sodium bicarbonate, citric acid, and sodium citrate, which help remove grime, mold, and lingering flavors from previous brews.
How to Descale Keurig? (Deep Inside Cleaning)
Descaling your Keurig brewer is an important task that should not be ignored. Over time, calcium deposits, also known as scale, can build up and impair the performance of your coffee maker.
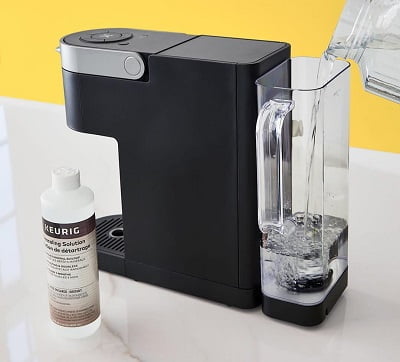
You’ll need a bottle of Keurig descaling solution, a large mug, and access to a sink. Make sure that the brewer is powered off and the water reservoir is empty. If your brewer has a Keurig water filter, remove it and set it aside. Also, disable any auto-off features.
1- Preapre a descaling solution
First, remove any remaining water from the water reservoir and discard any used K-cups from the machine.
Now add equal parts of clean water and the Keurig descaling solution to the water reservoir.
2- Start the Descaling process
Place a large mug or bowl on the drip tray and press the power button to turn the brewer back on.
Lift and lower the brewer handle and press the largest brew size button to start the descaling process.
Repeat this process until the descaling solution has completely drained the water tank. Then, let the brewer sit for 30 minutes while still turned on.
Some Keurig models have a dedicated descaling mode. For example, to enter descaling mode in Keurig Supreme you have to press the 8 and 10 oz buttons for 3 seconds and it will automatically run all the descaling solutions.
Make sure to enter the descaling mode if your model has it
3- Run a cleansing brew
Now detach and clean the water reservoir thoroughly with warm soapy water to remove any residual solution. Return the reservoir to the brewer and fill it with fresh water to the max fill line.
Perform the cleansing brew process at least 12 times, by pressing the largest brew size button. This will remove any remaining scales and odors of the descaling solution from the brewer.
Here are descaling instructions for every Keurig model
It’s important to descale your Keurig machine as soon as you notice any of the following signs
How to clean Keurig with Vinegar?
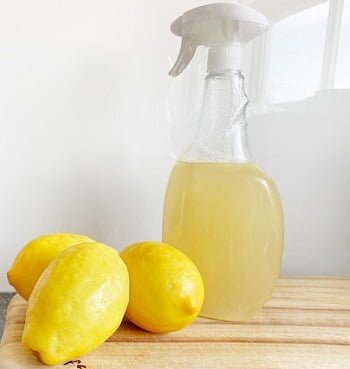
Cleaning your Keurig with vinegar is a cost-effective alternative to using a Keurig descaling solution. By using vinegar, you can save money on expensive commercial cleaners that require using the whole bottle each time.
The process is the same as descaling. Create a mixture of equal parts water and white vinegar and pour this solution into the water reservoir.
Vinegar is a good natural descaling agent, but it can leave a strong smell that can linger in your Keurig brewer. This can affect the taste of your coffee, so it’s important to run several cleansing cycles after using vinegar to remove the smell. I never like to descale my Keurig with vinegar for this reason.
How to clean Keurig Needles?
Cleaning Keurig needles is essential to prevent the accumulation of coffee grounds, which can clog the needles and prevent proper coffee extraction.
Clogged Keurig needles can prevent proper water flow, leading to inconsistent brews or even preventing the machine from working altogether.
You’ll need a large mug, a clean metal paper clip, and access to a sink. Follow these simple steps to do it in 10 minutes:
1- Remove the pod holder from the brewer
To remove the pod holder, lift the handle, grasp the top of the pod holder with one hand, and push it up.
2- Take out the funnel
Detach the funnel by pushing the sides of the pod holder
3- Clean the tubes and Pod holder
Straighten one side of the metal paper clip and insert it into the tube. Move it around to loosen any clogs and remove particles. Rinse the pod holder and funnel with water to remove any remaining debris.
4- Clean the entrance needles
Lift the brewer handle and find the entrance needle under the brewer’s head. It has two holes that need cleaning. Carefully insert the paper clip into the holes of the entrance needle and gently move it around to remove any particles.
Once the K-cup holder is clean and dry, place it back into the Keurig machine.
After cleaning the needles fill the water reservoir with fresh water and run a few water-only brew cycles. This will flush out any remaining debris and ensure the needles are clear.
That’s it! Your Keurig needles are now clean. Remember to be cautious with the sharp exit needle while cleaning.
It’s important to clean Keurig needles if you notice any of the following signs:
How to change Keurig Water Filters?
You must replace the Keurig water filters once every 2 months as the charcoal filters get saturated with impurities with time and loss ability to filter the water effectively
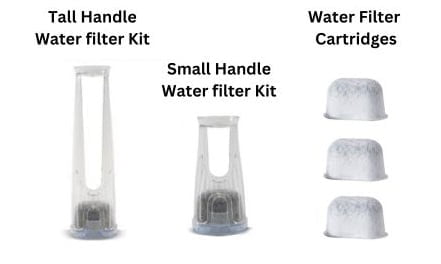
Start by determining the model of your Keurig coffee maker. Different models require different water filters, so it’s important to use the appropriate one.
Some models have a tall handle water fill kit while others have a small handle water filter kit and some models like K-Mini, K-Mini Plus, and K15 do not have water filters.
Here’s a guide on Keurig water filters
Here’s a step-by-step guide on how to replace or remove the charcoal water filter of your Keurig machine.
- Start by activating the new charcoal filter by soaking it in a bowl of fresh water for 5-10 minutes.
- Meanwhile, empty the water reservoir and locate the filter holder, usually positioned at the base of the water reservoir. Gently lift the filter holder out of its position.
- Slide the old filter out of its slot in the filter holder and discard it.
- After your new water filter is soaked for 5-10 minutes, rinse it with fresh water to eliminate any excess particles. Also clean and rinse the water filter handle properly.
- Now, securely slide the new filter into the designated slot of the filter holder, and ensure it fits properly. Then, place the filter holder back into its original position at the base of the water reservoir and reattach the water reservoir to your Keurig coffee maker.
- Plug in your coffee maker, power it on, and run a few cleansing brews without a K-Cup or coffee pod. This process will help flush out any remaining impurities.
It’s very important to change water filters very regularly especially if you use tap water for brewing coffee in your Keurig.
Final Thoughts
As a Keurig owner, I highly recommend following these cleaning steps to keep your machine running smoothly and enjoy consistently great-tasting coffee every time.
With a little regular maintenance, you can ensure that your Keurig remains in peak condition and provides you with the perfect cup of joe to start your day off right.
I hope now have a complete understanding of how to clean a Keurig coffee maker yourself. If you have any questions you can ask in the comments!
Cheers to a clean and delicious brew!
Also Check out How to remove coffee stains from Mugs
FAQs
Can you use hydrogen peroxide to descale Keurig?
Yes, you can use hydrogen peroxide to descale a Keurig coffee maker as an alternative to vinegar. However, it is important to be cautious as hydrogen peroxide can corrode metal parts.
Follow the same descaling steps and ensure thorough rinsing afterward to prevent any residue from affecting taste or causing damage.
Can you use apple cider vinegar instead of white vinegar in Keurig?
Yes, you can use apple cider vinegar as an alternative to white vinegar for cleaning a Keurig. Simply mix water and apple cider vinegar in the same ratio as mentioned in the instructions and run it through your machine to clean it effectively.
Can you use tap water in Keurig?
It is possible to use tap water in your Keurig coffee maker, but it is not recommended. Tap water may contain minerals that can lead to mineral deposits and clogging, impacting the machine’s performance. For the best taste and to avoid potential maintenance issues, use filtered or bottled water instead.
Read a guide on what water to use in Keurig
What happens if you don’t clean your Keurig?
Not cleaning your Keurig regularly can lead to the growth of bacteria, coffee build-up, and mineral buildup, which can result in a bad-tasting cup of coffee that lacks freshness. Mineral buildup can also cause leakages and damage your Keurig machine.

How do you get the descaling message off
What Model do you have?
Finally found a guide that didn’t make descaling sound like a chore. Your step-by-step instructions made the process quick and painless. My Keurig is now as good as new – cheers!
Descaling is such a pain, but this guide makes it seem way less daunting. Love the tip about using a rinse pods too!
Yeah Rinse Pods are really useful especially if you switch Pods often!
Never thought about using vinegar. Bet it smells weird though. Anyone tried vinegar? Worth the extra savings or not?
Yes, vinegar do leave a weird smell. You have to run 3-4 extra cleaning cycle to get rid of it!
Wow, didn’t know you could take apart so much of it. Kinda intimidating. Anyone ever break their Keurig trying to clean it? Or is it pretty foolproof?
Huh, never knew descaling was a thing. Been using my Keurig for years without it until it started making half cups. Oops? Wonder if it’s too late to descale now.
Vinegar vs. descaling solution – which do you prefer? I’ve heard mixed things. Any big difference?
I’ve tried both. Vinegar works fine and it’s dirt cheap, but man, that smell lingers for at least next 10 cups. Descaling solution is bit pricier but no nasty odor. Honestly, they both do the job. Just depends if you wanna save a few bucks or avoid the vinegar stink.
Thanks for the tips! How often should I clean the needle? My coffee’s tasting weird lately.
Have you ever considered if using tap water in your Keurig could be causing damage to the internal components of the machine? Is it worth investing in filtered water or even bottled water to ensure the longevity of your Keurig?
Yes, hard tap water can definitely cause mineral buildup in your Keurig over time. I personally use filtered tap water – it’s cost-effective and works great. Bottled water is fine too