To keep your Keurig coffee maker brewing delicious coffee consistently, it’s essential to descale every 3 to 6 months
But sometimes Keurig descale light stays on and won’t go off no matter how hard you try. This is more frustrating if the descaling light stays on even after descaling the machine.
In this article, I will thoroughly discuss how to turn off the descale light on Keurig and some tricks if it remains ON even after descaling. Keep reading to learn how!
3 Reasons why Keurig descale light stays on
- You haven’t run a proper descaling cycle.
- You haven’t entered the descaling mode on your Keurig while descaling.
- There is a blockage inside Keurig Needles.
As an Amazon Associate, I earn commission from qualifying purchases.
how to turn off descale light on Keurig
Descaling your Keurig machine must be the first thing you do as soon as you notice the descaling indicator. If you haven’t done descaling for a very long period then you might have to do it two to three times to get rid of scaling inside your machine.
I recommend you go with Keurig’s recommended descaling solution, or you can also go with the Vinegar solution.
First Propely Descale your Keurig
It’s also possible that you haven’t descaled the Keurig properly and in that case, the Keurig descale light won’t go off.
Follow these steps to turn off the descaling light on Keurig.
1) Unplug the machine, and drain any water left in the reservoir.
2) Take the water filter and coffee pods out of the machine.
3) Place a coffee mug underneath the coffee outlet.
4) Pour the Keurig descaling solution and filtered water into the water reservoir. Use a 1:1 ratio of Keurig descaling solution and water.
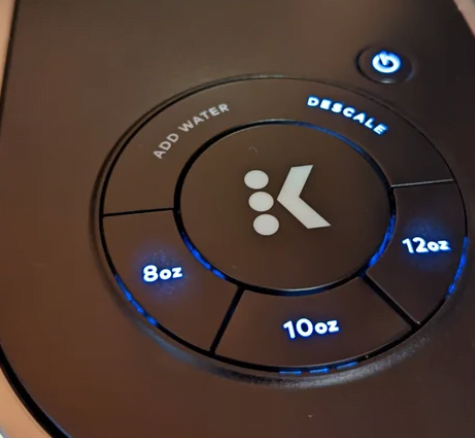
5) Press the 8-ounce & 12-ounce buttons on the Keurig machine for almost three seconds to activate the Descale Mode.
5*). If your Keurig doesn’t have a descaling mode just press the largest coffee button on your machine.
6) The descaling solution will start running through the machines. It will take around 10-15 minutes to drain all the solution.
6*) If your Keurig doesn’t have a descaling mode just keep pressing the largest brew button until the water tank becomes empty.
7) The descaling is completed. Now rinse the water tank properly and fill it with drinking water.
8) Repeat the same procedure with only water to clean out the traces of the descaling solution from the machine.
9) Keep running the rinse cycle until the water tank becomes completely empty and the machine starts showing the “Add Water” indicator.
“This is the most important part many people skip it”
Here are descaling instructions for all Keurig models
Reset the machine after descaling
Here’s how you can reset the machine after descaling.
Turn off the machine, remove the plug, remove the water reservoir, and let the machine rest for an hour before brewing coffee.
After an hour or so, Re-plug the machine, turn it on and hopefully, the descale light will not be flashing.
You might have forgotten to enter the descale mode
In some Keurig models like Keurig Supreme, there is a dedicated Descale mode. And if you perform the descaling procedure without entering that mode the descaling light will stay on.
In the case of Keurig Supreme, To enter descale mode; power the device off then press 8oz and 12oz at the same time for 3 seconds before it powers on into descale mode.
Run the descaling procedure again and your descale light will go off.
What to do if the Keurig descale light stays on even after descaling
While gunk buildup inside the Keurig is a common cause of the descaling light staying on, there are other factors that can trigger this indicator as well.
1) Clogged needle
Sometimes clogged Keurig needles might also cause the descaling light to stay on.
There are two needles inside the Keurig machine.
The entrance needle (present under the brewer’s head).
Exit needle (present in the bottom of the pod holder).
These needles make holes in the top and the bottom of the K-cup to allow easy flow of water through K-cup pods and make their way to a cup of coffee.
Residue from K-cup coffee pods can Clog the needles which will disrupt the flow of water through your Keurig machine, and cause the descale indicator to turn on.
So regular cleaning of needles is essential to maintain optimal performance of your machine.
Cleaning entrance needle
Be careful while cleaning the needles as they are very sharp.
- Unplug the machine
- Open the brewer’s head, and you can locate the entrance needle under the brewer’s head. There will be two holes in the needle that you need to clean.
- Insert a safety pin, a needle, or a straightened paper clip in the needles and move it around to loosen and remove any accumulated coffee grounds.
Cleaning Keurig exit needle
- Remove the pod holder by gently pushing it out and separate the funnel from the bottom.
- After removing the funnel you will find a tube present at the bottom of the pod holder.
- Insert a paper clip, safety pin, or needle inside the tube and move it around to loosen and remove any accumulated coffee grounds.
- Rinse the pod holder and funnel with tap water to remove any loose particles.
2) Tightly packed pods
You may encounter this problem while using refillable coffee pods. Packing too much coffee grounds in my K cup makes it difficult for water to pass through.
And when the water faces heavy resistance the descale light might get triggered.
So, it is recommended to fill the pods loosely (Never go beyond the max fill line!) and don’t use too fine coffee grounds either.
3) Plugged tubes
If you have already applied to above two methods and still the descale light is ON, then there might be some stubborn air bubbles or dirt particles caught inside the piping of your Keurig.
You may push them out by gently slapping your machine. This is actually a quick hack and works well for some users.
- Remove the reservoir, drip tray, filter, and any coffee pods from the machine.
- Hold your Keurig upside down over your kitchen sink and smash it on the side and base a few times.
- This little Keurig hack will release anything that has become lodged in the tubes.
- Finally, perform a brew cycle with clean water to clear up whatever was clogging your water flow.
Note: Don’t slap too hard. As it can damage the inside machinery of your machine and also void the warranty if your machine is new.
How to reset Keurig Descale light
Another solution to fix this issue is to reset the Keurig descaling light.
- Turn off the machine and unplug it.
- Remove the Keurig coffee maker’s top body with the help of a screwdriver.
- Now, remove the screw that secures the Descaler assembly and carefully remove it from the place
- Now, thoroughly wash Descaler with warm, soapy water.
- Reassemble the Descaler assembly on the Keurig coffee machine and turn on the device. Hopefully, it will fix this issue.
Don’t try this hack if your machine is still in the Warranty period
Why Descale light turn on in Keurig
The sole purpose of descaling light features in most coffee makers is to inform or indicate that your coffee machine is clogged and requires thorough cleaning/descaling.
When the sensors inside the Keurig machine detect a blockage in water flow across the pipe, the descale light starts flashing.
Hard water (containing a high concentration of calcium and magnesium) is considered to be the prominent culprit of clogging but some other factors such as air bubbles, the residue of coffee grounds, dirt, or other tiny particles also contribute to clogging.
So Keurig’s descaling indicator turns on when the machine requires cleaning. If the machine becomes extremely dirty, it will stop operating.
Here’s a guide on What is the Best water for Keurig Coffee Machine
Contact Keurig Cutomer Support
If you have tried running the required descaling procedure properly as per instructions and still the descaling indicator isn’t going off, you must contact Keurig customer support.
Sometimes, the descaling sensors inside the machine may have faults triggering this light unnecessarily.
Reaching out to the knowledgeable Keurig support team directly for assistance is recommended in this scenario rather than applying independent troubleshooting attempts especially when your machine is still in the warranty.
You can reach customer service here or call 866-901-2739.
Keurig Review Articles:
Final thoughts
Descaling alert is an important feature that reminds you to keep your Keurig clean and safe to use. But if the descaling light won’t go off even after descaling then there might be some other problem.
Make sure to descale the machine on time, clean the entrance and existing needles to unclog them, and don’t pack coffee pods too tightly.
OTHER KEURIG GUIDES

This article helped me get my five year old Keurig cleaned and working again. I don’t remember which model I have, so went through each of articles steps, then realized I needed to press the “K” button. It ran four cycles (4 12 oz cups each). Curiously, the on button stayed off for this and only “descale” and “K” buttons stayed on. Then the “descale” light finally went off. After missing obvious automatic descale machine has, (duh!) I was ready to junk it. Works fine now.
Glad to hear your Keurig’s back up and running
Finally got the d escape light to go off. Now that I want to run the descale solution through the system the keruig keeps shutting off no mater what I do.
Hi Robert,
Haven’t you descaled the machine already?