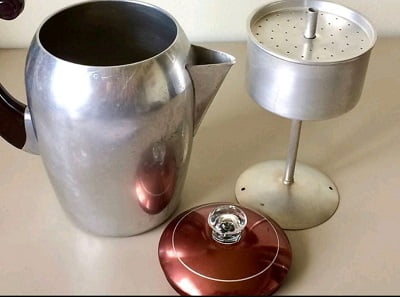
The percolator coffee maker is a classic brewer with a wide base for boiling water, a center tube for the flow, and a perforated basket where the coffee grounds go. Percolation has been around for a long time and is one of the oldest brewing methods for coffee.
The Percolator was first invented in 1819 by Parisian tinsmith Joseph-Henry-Marie Laurens, and the modern version was developed by Illinois farmer Hanson Goodrich in 1889. Originally, percolators were used on stovetops, but electric models are also available now.
How Does a Percolator Work?
Percolator coffee makers have two chambers: a lower one for water and an upper one for coffee grounds. As the water heats, it travels up a tube to the upper chamber, where it extracts flavors from the grounds. The brewed coffee then drips back down, and the cycle repeats.
This process continues, passing the liquid through the grounds multiple times, resulting in a strong brew. However, this repeated brewing can lead to over-extraction or even burnt coffee if not monitored carefully.
When brewed properly, the percolator produces a distinct, strong flavor that is unmatched by any other brewing method.
How to make coffee in a percolator? (Step by Step Instructions)
Here are step-by-step instructions for making coffee in a Percolator.
Step 1: Preparation
- Start by cleaning your percolator well. You don’t want yesterday’s coffee oils messing with today’s brew.
- Heat your water separately in a kettle or on the stovetop until it’s just about boiling. Using hot water in the bottom chamber is important. It allows the brewing to start quickly at the optimal temperature for proper extraction.
Step 2: Add the Coffee Grounds
- Take your coffee beans and grind them coarsely with sea salt texture. If you use a finer grind size, you’ll end up with grounds in your cup.
- Add the grounds to the filter basket. A good rule of thumb is about 2 tablespoons per 8 oz serving, but feel free to adjust to your taste.
- Give the basket a gentle shake to distribute the grounds evenly.
- Place the basket in its compartment in the percolator.
- Double-check that everything is screwed together tightly and the lid is securely in place.
Step 3: Brewing
- If you’re using a stovetop model, place it over low to medium heat. For electric models, follow the manufacturer’s instructions.
- Now, patience is key. You’ll start to hear a sputtering sound after a few minutes – that’s your cue that the magic is happening.
- Keep an eye on things. If coffee starts bursting out the top, turn the heat down. If the process seems too slow, turn it up a bit.
- Let it percolate for about 10-15 minutes, depending on how strong you like your coffee. The longer it goes, the stronger (and potentially more bitter) it gets.
Step 4: Finishing Up
- Once you’re happy with the brew time, remove the percolator from the heat.
- Let it rest for a minute or two. This gives any stray grounds time to settle at the bottom of the pot.
- Carefully remove the lid (watch out for steam!) and lift out the basket of grounds.
- Pour into your favorite mug and enjoy your freshly percolated coffee!
As an Amazon Associate, I earn commission from qualifying purchases.
What are the Best Percolator Coffee makers?
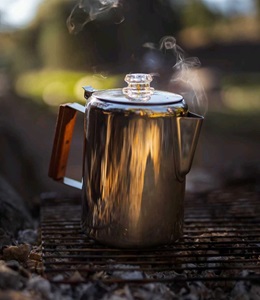
1. COLETTI Bozeman Percolator
The COLETTI Bozeman Percolator is a rugged, stainless steel Percolator perfect for camping enthusiasts and coffee purists alike.
It has a glass perk knob on top, which allows you to monitor the coffee’s brewing progress in real-time which is invaluable in preventing over-extraction and achieving the perfect brew strength consistently. It has a high-quality stainless steel body, ensuring longevity and maintaining the pure taste of coffee without any metallic undertones.
Its ergonomic wooden handle remains cool throughout the brewing process, while the precision-engineered spout prevents drips and ensures smooth pouring – practical features that enhance the overall brewing experience.
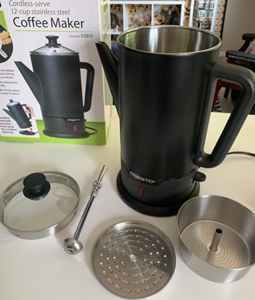
2. Presto Coffee Percolator (Electric Option)
If you want electric Percolator, the Presto Coffee Percolator makes an excellent choice. It’s designed for convenience: extremely easy to use and when the coffee’s ready, a signal light lets you know.
This stainless steel pot, with its sleek matte-black finish, is compact enough to save counter space yet versatile enough to brew up to 12 cups. The cordless design allows you to pour freely without worrying about the cord getting in the way and when you’re done, cleanup is easy thanks to its simple design.
Some Expert Tips for Percolators
A lot of folks don’t like percolator coffee because they say it comes out burnt or too bitter. While it’s true that they can make more bitter coffee than other brewing methods, it doesn’t have to be overly bitter. Here are some of my exclusive tips, from choosing the right beans to coffee ratio to the perfect timing for making a decent drink in a percolator.
What is the best coffee for Percolator?
Light or medium roasts are best for the Percolator. Milder roasts work well because they extract more slowly, allowing the percolator’s repeated cycling to draw out rich flavors without becoming bitter. Dark roasts, on the other hand, extract flavors more quickly, which can lead to over-extraction, resulting in a cup that’s too bitter or harsh.
Read a Guide on Different Coffee roasts
What is the Best Grind size for Percolator?
For percolator coffee, a coarse to medium-coarse grind works best, similar to what you’d use for a French Press. This larger grind size is ideal because it allows water to flow through the grounds without becoming clogged or over-extracted. Finer grinds can lead to bitter coffee and might even slip through the perforations, ending up in your cup.
Many people make the mistake of using store-bought ground coffee in a percolator. The issue is that most store-bought coffee grounds are medium or medium-fine in size, which is ideal for drip brewers. If you must buy ground coffee, make sure it is coarse. Otherwise, grinding it yourself is always the best option!
Read a Guide on Coffee grind Sizes
What is the best coffee-to-water ratio for a percolator?
The ideal coffee-to-water ratio for a percolator typically falls between 1:15 and 1:18. In practical terms, this translates to about 2 tablespoons (or 10-12 grams) of coffee grounds per 8 oz cup of water. This ratio strikes a good balance, allowing for a flavorful brew without overpowering bitterness.
How long to percolate coffee?
The ideal percolation time for coffee typically ranges from 10 to 15 minutes on low to medium heat. For me, 12 minutes hits the sweet spot, giving the water just enough time to coax out those delicious flavors and oils from coffee grounds.
But hey, coffee’s a personal thing! If you like it bold, let it percolate a bit longer. Prefer it mellower? Shorten that brew time. It’s all about finding your perfect cup through a bit of trial and error and experimentation.
The percolating time also depends on the model some percolator brews more quickly than others and also depends on the amount you are brewing; less water will heat up quickly and will require less time.
Just remember, using high heat is a big no-no. High temperatures can turn your drink into a bitter mess and also cause the water to boil too vigorously and create a muddy texture.
Always start with Hot Water
Starting your brewing with hot water is the best tip for percolators many folks overlook. It’s tempting to just fill it up with cold tap water, but that’s actually setting you up for a less-than-stellar brew.
When you start with cold water, your coffee begins extracting at a lower temp and slowly heats up. This uneven heat can lead to inconsistent flavors in your cup.
And when you start with hot water, you’re brewing at a steady temperature right from the start. This consistency throughout the process helps you extract all those delicious flavors evenly, resulting in a smoother and more balanced drink.
Clean your Percolator right after brewing
The easiest and best way to clean your percolator is right after brewing. If you don’t do it Coffee oils and residue can build up, leading to off-flavors in future brews and potential permanent stains if left uncleaned.
To clean, first, unplug the percolator if it’s electric and let it cool slightly. Then, disassemble the parts and rinse them thoroughly with hot water. For a deeper clean, use a mixture of warm water and mild dish soap, scrubbing gently with a soft brush to remove any stubborn coffee oils. Rinse all parts well to ensure no soap residue remains.
Does Percolator make good coffee compared to other brewing methods?
Percolator coffee has its own unique charm, but it’s definitely a different beast compared to other brewing methods. In my experience, it tends to produce a stronger and more bitter cup than drip or pour-over coffee.
One of the main drawbacks is that percolators brew at boiling temperatures exceeding 210°F, which is hotter than the ideal 195-205°F range for optimal extraction. This can lead to some bitterness and burnt taste in the final cup.
Compared to pour-over and drip coffee makers, percolator offers less control over brewing parameters and is harder to fine-tone. Pour-over brewers give you more control over factors like saturation time, temperature, and flow rate, so you can make a consistently better cup of coffee every time.
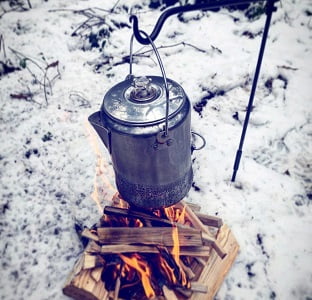
That said, I love using my percolator when I’m camping – it’s durable, doesn’t need electricity, and makes a hearty brew that really hits the spot outdoors. While it might not win awards for subtlety, percolator coffee has a distinct bold character that is worth trying.
Read comparison of Percolator vs French Press Coffee maker
What’s the difference between a percolator and a moka pot?
Many people confuse Percolators with Moka Pots which is another very similar coffee brewing device. Both have a bottom chamber for water and a separate basket for coffee grounds. When you heat them up, the water in the bottom gets hot and travels upwards through a tube.
But here’s the difference: In a percolator, the brewed coffee drips back down and keeps cycling through the grounds while in a moka pot, the coffee only passes through once before collecting in the top chamber, ready to pour.
I would always choose a Moka pot over a Percolator they are a bit easier to get right and make smoother and sweeter coffee with the same strong profile.
Moka Pots can be electric or stovetop like the percolators but they usually have a very small size and are suitable for making only 1-2 cups at a time.
Read about Other brewing Methods

Percolator vs moka pot… always mixed those up! Turns out they’re pretty different. Ever used both? Which one makes better strong coffee in your opinion?
Yeah, I have used them both! and for me Moka Pot is slightly better than a Percolator. It doesn’t tastes bitter and makes strong espresso-like. Plus it’s less fussy to use.
Never thought about using hot water to start. Makes sense though. Gonna give that a shot next time.
Been using a percolator wrong for years. The tip about pre-heating water And watching for the perfect Grind size, Genius. My Camping brew thanks you!
Love my percolator but struggled with consistency. Your step-by-step guide is a game-changer. Especially the part about starting with hot water. Coffee’s smoother now. Much appreciated!
Great article! Always thought percolators made bitter coffee. Your tips changed the game. Started with hot water, shortened brew time. Now my coffee’s smooth and tasty.
Percolators can certainly make a nice cup of coffee when used properly!
Thanks for explaining the timing thing! Been cooking my coffee way too long and wondering why it tastes like burnt rubber lol.
Thanks for the guide! I had no clue percolators could actually make smooth coffee. Might give it another shot now.
Thanks for the clear instructions! Got a vintage percolator at a yard sale last weekend and had no clue how to use it. Making my first percolator coffee now!
I’ve had a percolator gathering dust for years because my coffee always came out bitter. Turns out my technique wasn’t right. Just tried the method described here and wow – smoothest percolator coffee ever!
Just made a some with a percolator and it came out weak! Wish I read these beforehand. Went to my French press it came out great! Hmmm!